
📚 This article is part of a series on setting up Neon for dev, test, and staging environments while keeping your prod database in RDS. Find out what we’re talking about.
In a previous blog post, we showed you how to create a Neon Twin using a GitHub Action that automatically runs a pg_dump of your RDS production database and restores it to Neon on a recurring nightly schedule.
In this blog post, we’ll guide you through setting up a Slack Webhook to send notifications to a public Slack channel. This will inform your team about the latest pg_dump and restore activities.
By using Slack instead of relying on GitHub email notifications, you can avoid the need to add every developer who needs this information to the GitHub Repository where the Action runs.
We’ll also cover how to surface more detailed information about the dump and restore including the database name, size how long the job took to complete, and how to handle failures.

Prerequisites
Before diving in, ensure you have the following:
- Completion of previous steps. Make sure you have completed all the steps outlined in the previous article, particularly the setup of the Neon Twin and the GitHub Action for pg_dump and restore.
- Slack API admin access. You’ll need administrator privileges to your company’s Slack workspace to create and manage Slack apps and webhooks.
- GitHub repo access. Ensure you have access to the GitHub repository where the Actions will run, including permissions to manage Actions and Secrets.
Quick start
👉 All the code shown in this article can be found on this GitHub repo: create-neon-twin-slack.yml.
There are two additional Actions that you might like to use for reference:
- create-neon-twin-default.yml: A simple workflow that handles just a pg_dump and restore
- create-neon-twin-ssl.yml: An example of how to handle SSL Certificates as outlined in this community blog post: How to Use PostgreSQL SSL certificates in GitHub Actions.
How to build Slack notifications to monitor pg_dump and restores
In this section, we will guide you through how to set up Slack notifications for monitoring your pg_dump and restore workflows. The process looks like this:
- Creating a Slack channel in your company’s Slack workspace for receiving notification
- Setting up and configuring a Slack App using the Slack developer console
- Modify your existing GitHub Actions workflow (from the previous blog post)
- Develop JavaScript functions to post formatted notifications to your Slack channel
- Commit changes and deploy the action
Let’s get to it.
Create the Slack channel
To start, set up a dedicated channel in your company’s Slack workspace for receiving notifications. For this example, we’ll use the channel name #rds-to-neon-twin.
Create a Slack app
We’ll use the Slack developer console to create and configure an app. This involves naming the app, granting it access to your Slack workspace, and generating a Webhook URL for sending notifications.
If you have administrator privileges to your company’s Slack account, head over to https://api.slack.com/apps and click Create New App.

Create Slack app from manifest
From the available options select, From an app manifest.

Select workspace
From the dropdown list: Pick a workspace to develop your app.

Slack app name
Edit the JSON data and give your application a name.

App summary
Click Create to finish creating your Slack application.

Basic Information
With your app created, navigate to: Basic Information from the sidebar and update the Display Information. These details will be visible when you add the app to your company’s Slack workspace.

Active Slack webhooks
Navigate to: Incoming Webhook and click the toggle switch to On.

Add webhook to workspace
On the same page, scroll down and click the Add New Webhook to Workspace button.

Select channel
From the dropdown list select the channel you’d like to post notification to.

Webhook URL
You will now be able to Copy the Webhook URL. Add this as an env var in your project and name it SLACK_WEBHOOK_URL as you’ll need this in the next step.

Update GitHub Action
Now, it’s time to update the workflow we set up in the previous blog post. To post a notification to Slack with information about the pg_dump/restore job there are a number of additions that need to be made to the .yml file, and three new JavaScript files that are responsible for posting a formatted message to Slack for both success and failure scenarios.
To begin with, add the following to your .yml file and we’ll explain what each part is for.
name: Create Neon Twin

on:
  schedule:
    - cron: '0 0 * * *' # Runs at midnight ET (us-east-1)
  workflow_dispatch: # Enable manual triggering

env:
  PROD_DATABASE_URL: ${{ secrets.PROD_DATABASE_URL }} # Production or primary database
  DEV_DATABASE_URL: ${{ secrets.DEV_DATABASE_URL }} # Development database
  PG_VERSION: '17'
  SLACK_WEBHOOK_URL: ${{ secrets.SLACK_WEBHOOK_URL }}
  NODE_VERSION: '20.x'

jobs:
  capture-start-time:
    runs-on: ubuntu-latest

    steps:
      - name: Capture start time
        id: capture-start-time
        run: |
          echo "start_time=$(date --utc +"%Y-%m-%dT%H:%M:%SZ")" >> $GITHUB_OUTPUT

    outputs:
      start_time: ${{ steps.capture-start-time.outputs.start_time }}

  dump-and-restore:
    runs-on: ubuntu-latest
    needs:
      - 'capture-start-time'

    steps:
      - name: Install PostgreSQL
        run: |
          sudo apt update
          yes '' | sudo /usr/share/postgresql-common/pgdg/apt.postgresql.org.sh
          sudo apt install -y postgresql-${{ env.PG_VERSION }}

      - name: Set PostgreSQL binary path
        run: echo "POSTGRES=/usr/lib/postgresql/${{ env.PG_VERSION }}/bin" >> $GITHUB_ENV

      - name: Dump from RDS and Restore to Neon
        run: |
          $POSTGRES/pg_dump "${{ env.PROD_DATABASE_URL }}" -Fc -f "${{ github.workspace }}/prod-dump-file.dump"
          $POSTGRES/pg_restore -d "${{ env.DEV_DATABASE_URL }}" --clean --no-owner --no-acl --if-exists "${{ github.workspace }}/prod-dump-file.dump"

  db-query:
    runs-on: ubuntu-latest
    needs:
      - dump-and-restore

    steps:
      - name: Install PostgreSQL
        run: |
          sudo apt update
          yes '' | sudo /usr/share/postgresql-common/pgdg/apt.postgresql.org.sh
          sudo apt install -y postgresql-${{ env.PG_VERSION }}

      - name: Set PostgreSQL binary path
        run: echo "POSTGRES=/usr/lib/postgresql/${{ env.PG_VERSION }}/bin" >> $GITHUB_ENV

      - name: Database Query
        id: db-query
        run: |
          echo "database_size=$($POSTGRES/psql "${{ env.PROD_DATABASE_URL }}" -t -c "SELECT pg_database_size(current_database());")" >> $GITHUB_OUTPUT
          echo "database_name=$($POSTGRES/psql "${{ env.PROD_DATABASE_URL }}" -t -c "SELECT current_database();")" >> $GITHUB_OUTPUT

    outputs:
      database_size: ${{ steps.db-query.outputs.database_size }}
      database_name: ${{ steps.db-query.outputs.database_name }}

  capture-end-time:
    runs-on: ubuntu-latest
    needs:
      - db-query

    steps:
      - name: Capture end time
        id: capture-end-time
        run: |
          echo "end_time=$(date --utc +"%Y-%m-%dT%H:%M:%SZ")" >> $GITHUB_OUTPUT

    outputs:
      end_time: ${{ steps.capture-end-time.outputs.end_time }}

  post-to-slack-success:
    runs-on: ubuntu-latest
    needs:
      - capture-start-time
      - db-query
      - capture-end-time
    if: ${{ success() }}

    env:
      DATABASE_SIZE: ${{ needs.db-query.outputs.database_size }}
      DATABASE_NAME: ${{ needs.db-query.outputs.database_name }}
      JOB_START_TIME: ${{ needs.capture-start-time.outputs.start_time }}
      JOB_END_TIME: ${{ needs.capture-end-time.outputs.end_time }}

    steps:
      - name: Checkout repository
        uses: actions/checkout@v4

      - name: Install dependencies
        run: npm ci

      - name: Run Success script
        run: |
          node src/slack-success.js

  post-to-slack-failure:
    runs-on: ubuntu-latest
    needs:
      - dump-and-restore
      - db-query
    if: ${{ failure() }}

    steps:
      - name: Checkout repository
        uses: actions/checkout@v4

      - name: Install dependencies
        run: npm ci

      - name: Run Failure script
        run: |
          node src/slack-failure.js
Environment variables
There are two new variables this action needs. The Slack Webhook URL from the previous step (this one also needs to be added to your GitHub Secrets) and a Node version which is set “globally” so that later steps can run the success and failure JavaScript scripts.
Capture start time
The capture-start-time job does as the name describes and captures the time the job started. Using GitHub Actions outputs, the value of the current time is stored as start_time so it can be referenced by the post-to-slack-success, which we’ll explain in a later step.
Query database
The db-query job is where you can query the production database and determine the database_size, and database_name. You could perform any queries in this job that suit your needs. Both values are stored as outputs so they can also be referenced by the post-to-slack-success job. This job needs the dump-and-restore job.
Capture end time
Similar to the start time job this job captures the value of the current time and stores it as end_time so it can also be referenced by the post-to-slack-success job.
Post success
This job is triggered by GitHub Actions built in if: ${{ success() }} condition. Only if the previous jobs as defined by needs are successful will this job run. The four environment variables are set using values from the previous jobs. They are:
- DATABASE_SIZE
- DATABASE_NAME
- JOB_START_TIME
- JOB_END_TIME
Setting environment variables in this way makes them available to JavaScript / Node environments.
The last part of this job is to run the src/slack-success-.js file which we’ll cover in a moment.
Post failure
Similar to the success job, this job is triggered by if: ${{ failure() }} and is only run if any of the previous jobs defined by needs fail. Unlike the success job, there are no environment variables.
The last part runs the src/slack-failure.js file which we’ll cover in the following steps.
Create Slack notification scripts
To complete the setup, we need to create the scripts that will handle sending notifications to Slack. There are three essential files required for this:
- src/slack-success.js: This script is triggered when all jobs complete successfully and sends a success notification to the Slack channel.
- src/slack-failure.js: This script is triggered when any job fails and sends a failure notification to the Slack channel.
- src/format-date.js: A utility function to format the date and time values captured by the previous jobs.
Additionally, you need to install the dotenv dependency to allow these scripts to access your environment variables and GitHub Secrets.
To install the dependency, run:
npm install dotenv
Format date
Create a directory named src, then create a file named format-date.js and add the following code.
// src/format-date.js

const formatDate = (dateString) => {
  const date = new Date(dateString).toLocaleString('en-US', {
    day: 'numeric',
    month: 'long',
    weekday: 'long',
    year: 'numeric',
  });

  const time = new Date(dateString).toLocaleTimeString('en-US', {
    hour12: true,
    hour: 'numeric',
    minute: 'numeric',
  });

  return {
    date,
    time,
  };
};

export default formatDate;
Slack success
Create a file named slack-success.js and add the following code. This file is used when all jobs complete successfully.
// src/slack-success.js

import dotenv from 'dotenv';
dotenv.config();

import formatDate from './format-date.js';

const init = async () => {
  const bytes = parseInt(process.env.DATABASE_SIZE, 10) || 0;
  const gigabytes = (bytes / (1024 * 1024 * 1024)).toFixed(2);
  const name = process.env.DATABASE_NAME || 'undefined';
  const start = new Date(process.env.JOB_START_TIME) || new Date();
  const end = new Date(process.env.JOB_END_TIME) || new Date();
  const duration = end - start;
  const hours = Math.floor(duration / (1000 * 60 * 60));
  const minutes = Math.floor((duration % (1000 * 60 * 60)) / (1000 * 60));
  const seconds = Math.floor((duration % (1000 * 60)) / 1000);

  try {
    fetch(process.env.SLACK_WEBHOOK_URL, {
      method: 'POST',
      headers: {
        'Content-Type': 'application/json',
      },
      body: JSON.stringify({
        blocks: [
          {
            type: 'header',
            text: {
              type: 'plain_text',
              text: '☝️ A new Neon Twin is available!',
              emoji: true,
            },
          },
          {
            type: 'divider',
          },
          {
            type: 'section',
            text: {
              type: 'plain_text',
              text: `Created: ${formatDate(start).date}`,
            },
          },
          {
            type: 'context',
            elements: [
              {
                type: 'mrkdwn',
                text: `• Size: ${gigabytes} GB\n• Name: ${name}\n• Start: ${formatDate(start).time}\n• End: ${
                  formatDate(end).time
                }\n• Duration: ${hours} hours, ${minutes} minutes, ${seconds} seconds\n`,
              },
            ],
          },
        ],
      }),
    });
  } catch (error) {
    console.error(error);
  }
};

init();
The above code will create a formatted message using Slack special message syntax and includes information about your job. The message that appears in Slack will look similar to the below. You can read more about posting messages in the Slack documentation.

You can use Slack’s Block Kit Builder to create a message format that suits your needs and or create different environment variables that can be used to surface important information within the message.
Slack failure
Create a file named slack-failure.js and add the following code. This file is used when any jobs fail.
// src/slack-failure.js

import dotenv from 'dotenv';
dotenv.config();

import formatDate from './format-date.js';

const init = async () => {
  try {
    fetch(process.env.SLACK_WEBHOOK_URL, {
      method: 'POST',
      headers: {
        'Content-Type': 'application/json',
      },
      body: JSON.stringify({
        blocks: [
          {
            type: 'header',
            text: {
              type: 'plain_text',
              text: '🚨 A Neon Twin failed',
              emoji: true,
            },
          },
          {
            type: 'divider',
          },
          {
            type: 'section',
            text: {
              type: 'plain_text',
              text: `Failed: ${formatDate(new Date()).date}`,
            },
          },
        ],
      }),
    });
  } catch (error) {
    console.error(error);
  }
};

init();
The above code will create a formatted message using Slack special message syntax but doesn’t include information about your job. The message that appears in Slack will look similar to the below. You can read more about posting messages in the Slack documentation.

You can use Slack’s Block Kit Builder to create a message format that suits your needs.
Deploy Action
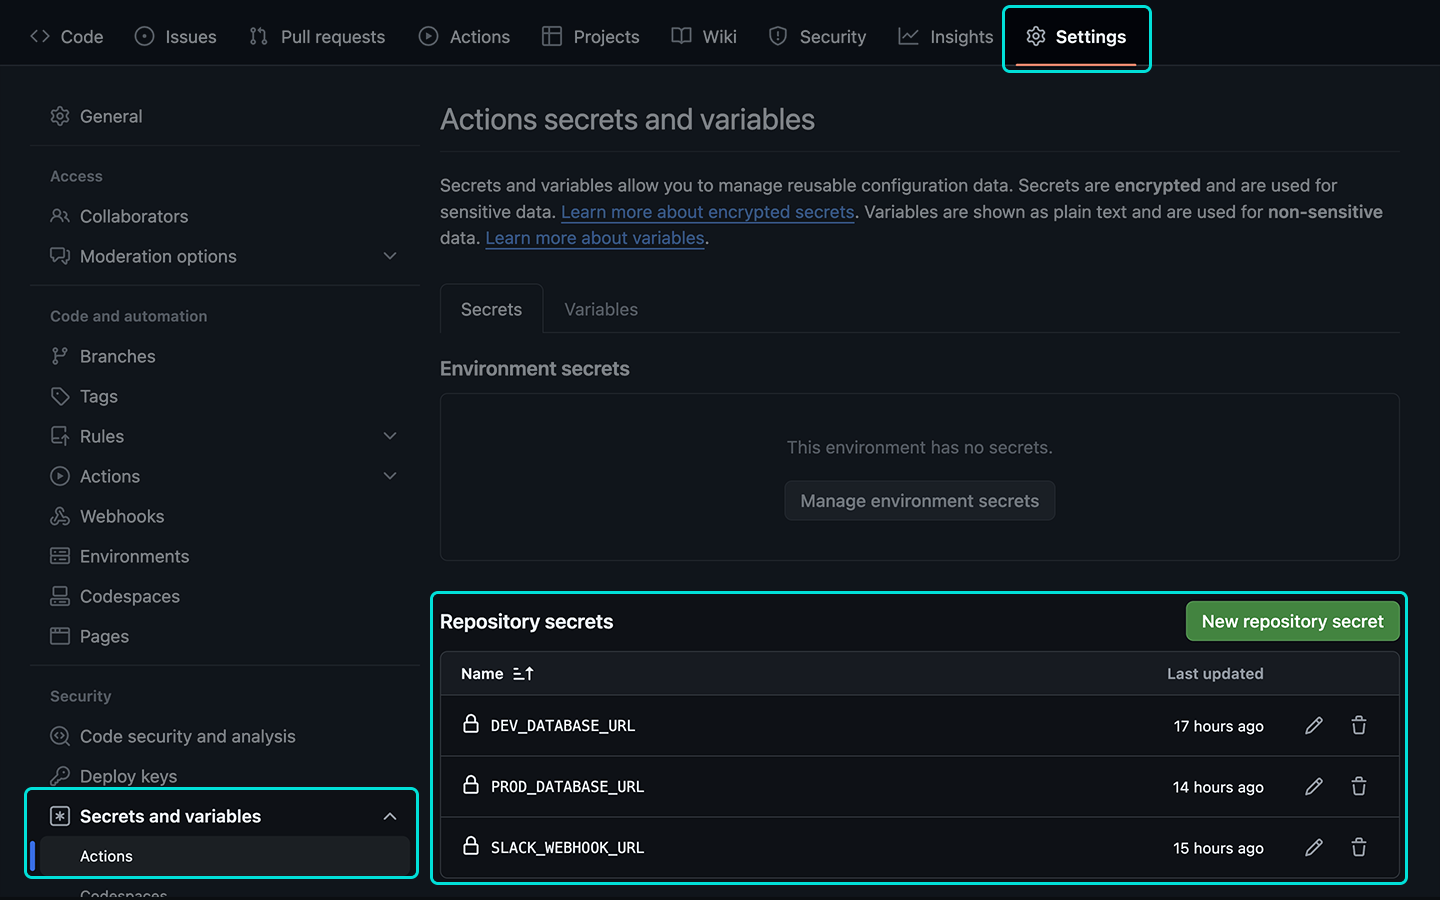
The final step is to commit your changes and deploy the action. To complete the deployment,
- Navigate to your GitHub repo
- Go to Settings > Secrets and variables > Actions
- Click on New repository secret
- Add the following environment variable:
SLACK_WEBHOOK_URL
During development, you can manually trigger the workflow from the GitHub UI:
- Navigate to Actions in your repository
- Select the create-neon-twin workflow
- Click on Run workflow
And you can run the JavaScript files directly from your terminal for testing, although some environment variables, DATABASE_SIZE, JOB_START_TIME, etc, won’t be available.
node src/slack-failure.js
Finished
And that’s it. You now have a full pg_dump and restore of your production database ready and waiting for you as a Neon Twin, plus, a convenient way for everyone involved to be notified when a new Twin is available!
Next steps
Continue building the workflow: Navigate to Part IV of the series – How to deploy a chance tested in Neon to prod in RDS
In case you missed it
Part I: Building a Neon Twin: Move Dev/Test/Staging to Neon, Keep Production on RDS
Part II: Optimize your AWS RDS Dev Environments with Neon Postgres
Check out the Twin Thing app—it helps you build your Github Action workflows to build your Neon Twins:


