Easily Anonymize Production Data in Postgres
Use Neon's Postgres database branching and PostgreSQL Anonymizer to develop in production-like environments with masked PII.

Note: The extension used in this article is currently available on request. Please reach out on Discord; we’ll be happy to help you get up and running.
Developing and testing against a database that resembles production is critical to identifying bugs and scalability challenges before they end up in your production environment.
Neon’s serverless Postgres simplifies providing developers with production-like database environments that can scale to zero when not being queried. This means you don’t pay for development and preview environments you aren’t actively using. Our database branching capability enables teams to create copies of their production databases in seconds, but with great power comes great responsibility.
Protecting personally identifiable information (PII) and adhering to data processing and residency regulations such as the General Data Protection Regulation (GDPR) require careful consideration when creating production-like environments. Failure to take adequate steps to protect PII and follow regulations can result in hefty financial penalties.
In this post, you’ll learn to use the PostgreSQL Anonymizer extension with Neon’s branching feature to create production-like development and preview environments that contain anonymized data as part of your CI/CD (continuous integration/continuous delivery) pipeline. If you’d like to see a live example built using Next.js, GitHub Actions for CI/CD, and Vercel for hosting, visit the evanshortiss/neon-pg-anon-example repository on GitHub.
The Key Ingredients: PostgreSQL Anonymizer and Neon Branching
PostgreSQL Anonymizer in 60 Seconds
PostgreSQL Anonymizer is a Postgres extension designed to streamline the process of anonymizing the data in Postgres databases. Installing the extension provides a set of masking functions that can be used to either dynamically or statically mask data, or create anonymized dumps of your database.
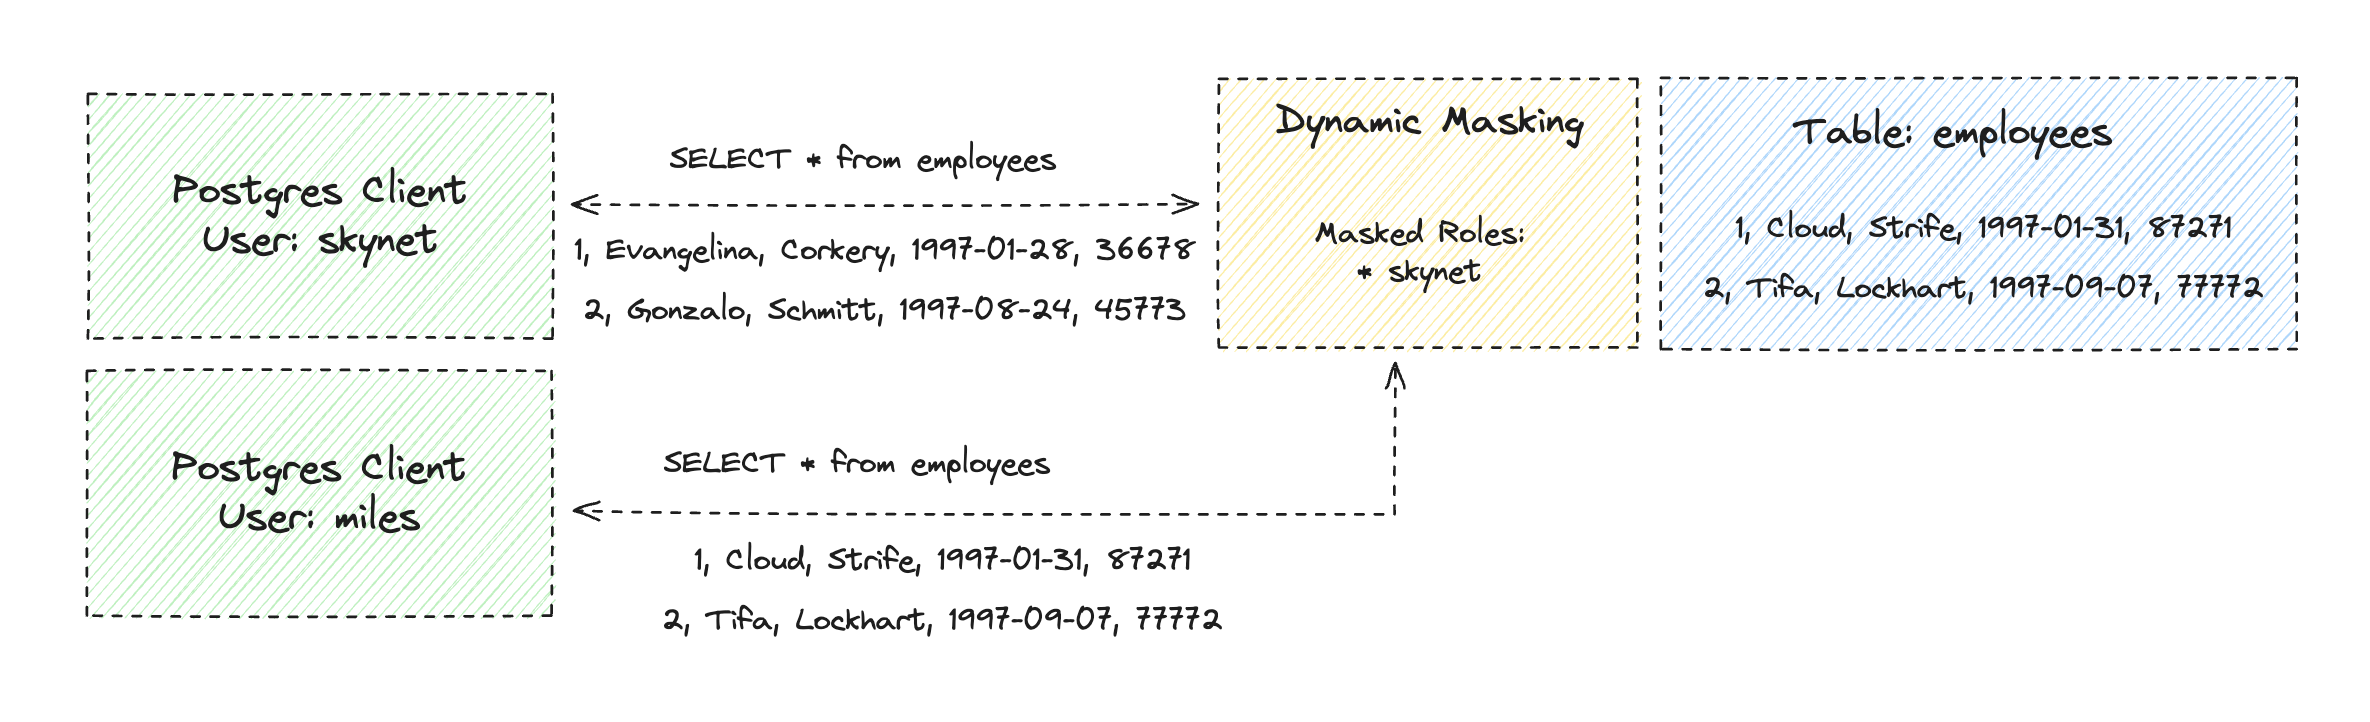
As the name suggests, dynamic masking dynamically masks column data in real time as a user queries it. Masking can be applied selectively based on the role being used to perform queries. Think of it as a layer between the underlying data and connected Postgres clients, as shown in the following illustration.
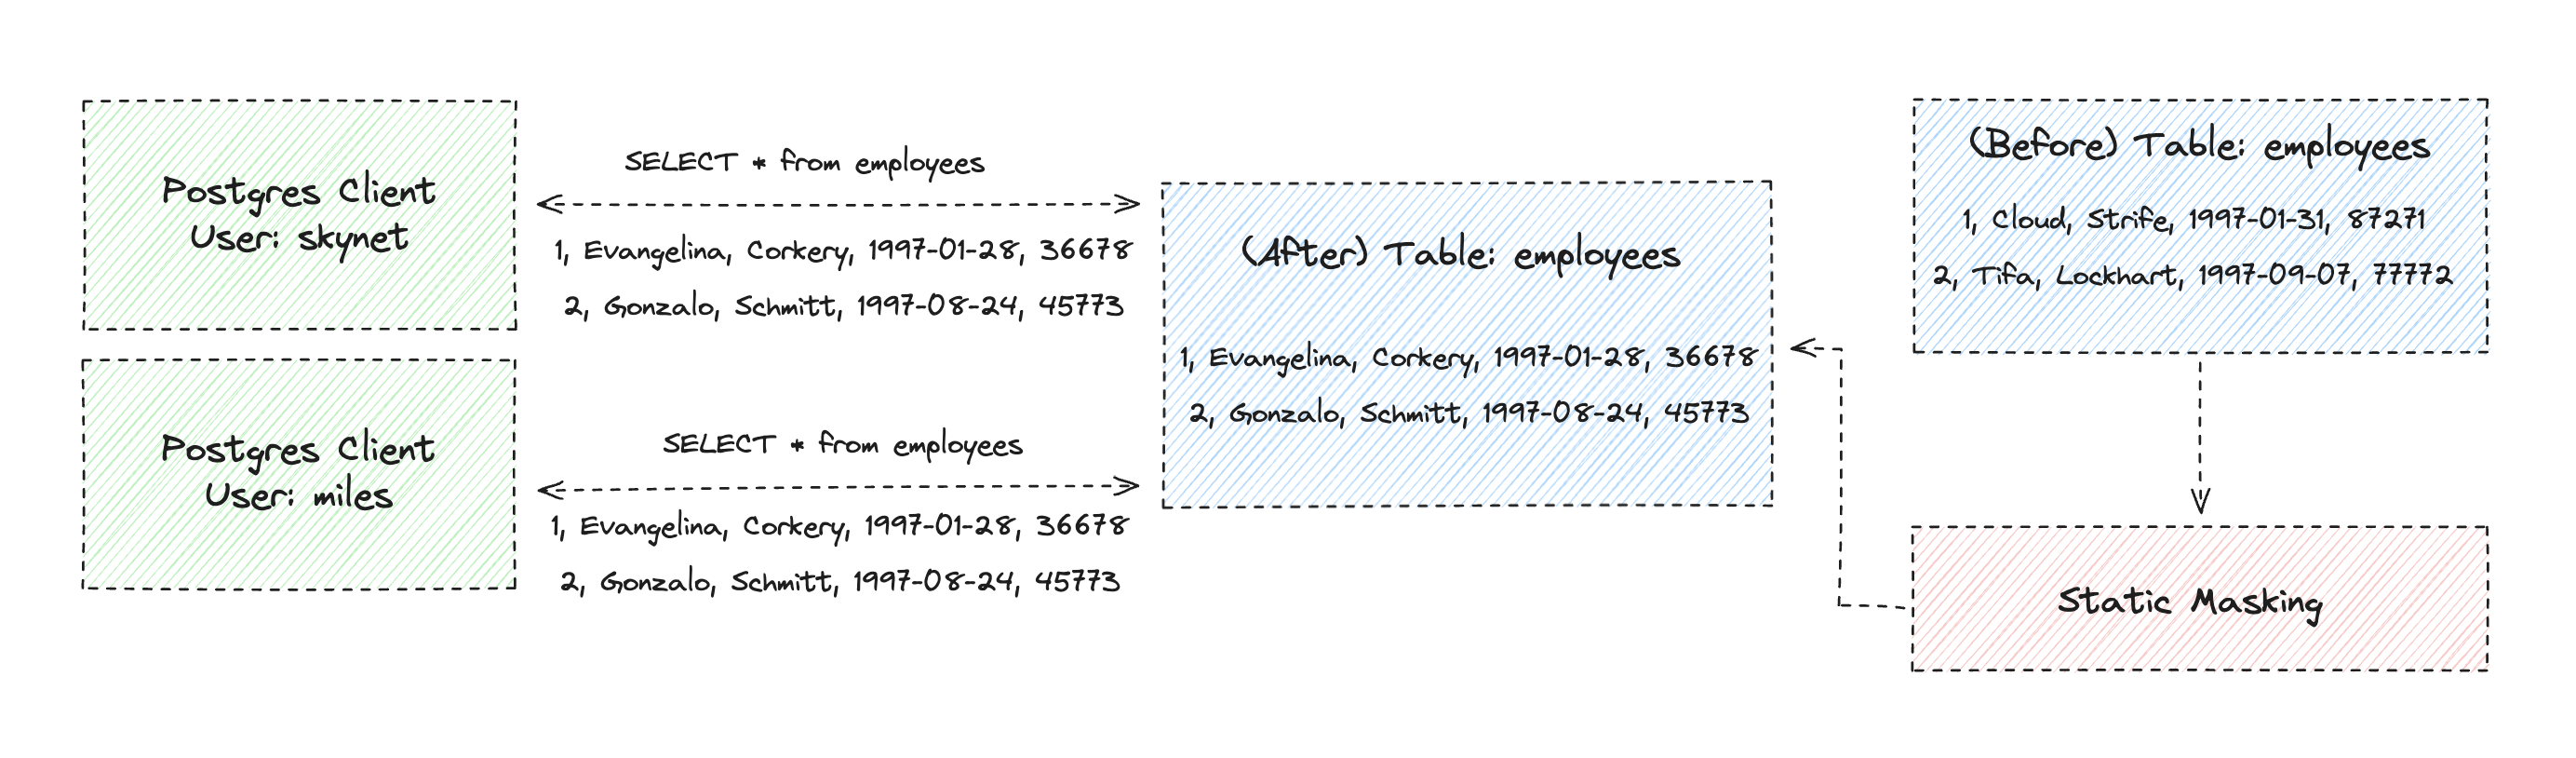
On the other hand, static masking permanently replaces column values in a table with masked values. In other words, static masking is destructive and guarantees the data is anonymized regardless of the role used to query it. The challenge with static masking is that you must create a copy of your database to perform the masking unless you’re OK with destroying your production data!
Neon Branching
Creating a copy of your production database in 1 second is possible using Neon’s database branching feature. In case you missed our recent video on that topic, here it is.
Now, let’s see how easy it is to create an anonymized version of your database on Neon!
Anonymize Production Data in Postgres: Step by Step
Create a Postgres Database on Neon and Insert Sample Data
Sign up for Neon and create a project. This project will contain the Postgres database you use to follow along with the rest of this article.
- Enter a project name.
- Use the default database name of
neondb. - Choose the region closest to the location where your application will be deployed.
Click the Create project button.
Select the SQL Editor from the menu on the left-side of your project dashboard in the Neon Console. Run the following queries to create employee and employee_salary tables.
CREATE TABLE employee (
    id INT GENERATED BY DEFAULT AS IDENTITY PRIMARY KEY,
    first_name VARCHAR(255) NOT NULL,
    last_name VARCHAR(255) NOT NULL,
    hire_date date NOT NULL,
    zipcode VARCHAR(5) NOT NULL
);

CREATE TABLE employee_salary (
    id INT GENERATED ALWAYS AS IDENTITY PRIMARY KEY,
    employee_id INT NOT NULL,
    amount NUMERIC(10, 2) NOT NULL,
    CONSTRAINT fk_employee
        FOREIGN KEY (employee_id)
        REFERENCES employee (id)
        ON DELETE CASCADE
);
Next, insert some data into the tables.
INSERT INTO employee (id, first_name, last_name, hire_date, zipcode) VALUES
(1, 'Cloud', 'Strife', '1997-01-31', '87271'),
(2, 'Tifa', 'Lockhart', '1997-09-07', '77772'),
(3, 'Barret', 'Wallace', '1997-11-17', '77772'),
(4, 'Biggs', 'Wedge', '1997-11-17', '10101'),
(5, 'Jessie', 'Rasberry', '1997-11-17', '10101');

INSERT INTO employee_salary (employee_id, amount) VALUES
(1, 10000.50),
(2, 12500.00),
(3, 15000.75),
(4, 11000.00),
(5, 11000.00),
(2, 14000.00),
(1, 12000.50);
For this post, let’s assume that this is your production data. Given that this data contains the PII of fictional employees, you need to take adequate steps to avoid exposing it and only process it in regions where you’re permitted to do so.
Enable the PostgreSQL Anonymizer Extension
To reduce the risk of exposing data during development and testing but retain a dataset similar in size and scope to your production dataset, you’ll create a copy of your production database using Neon’s database branching feature.
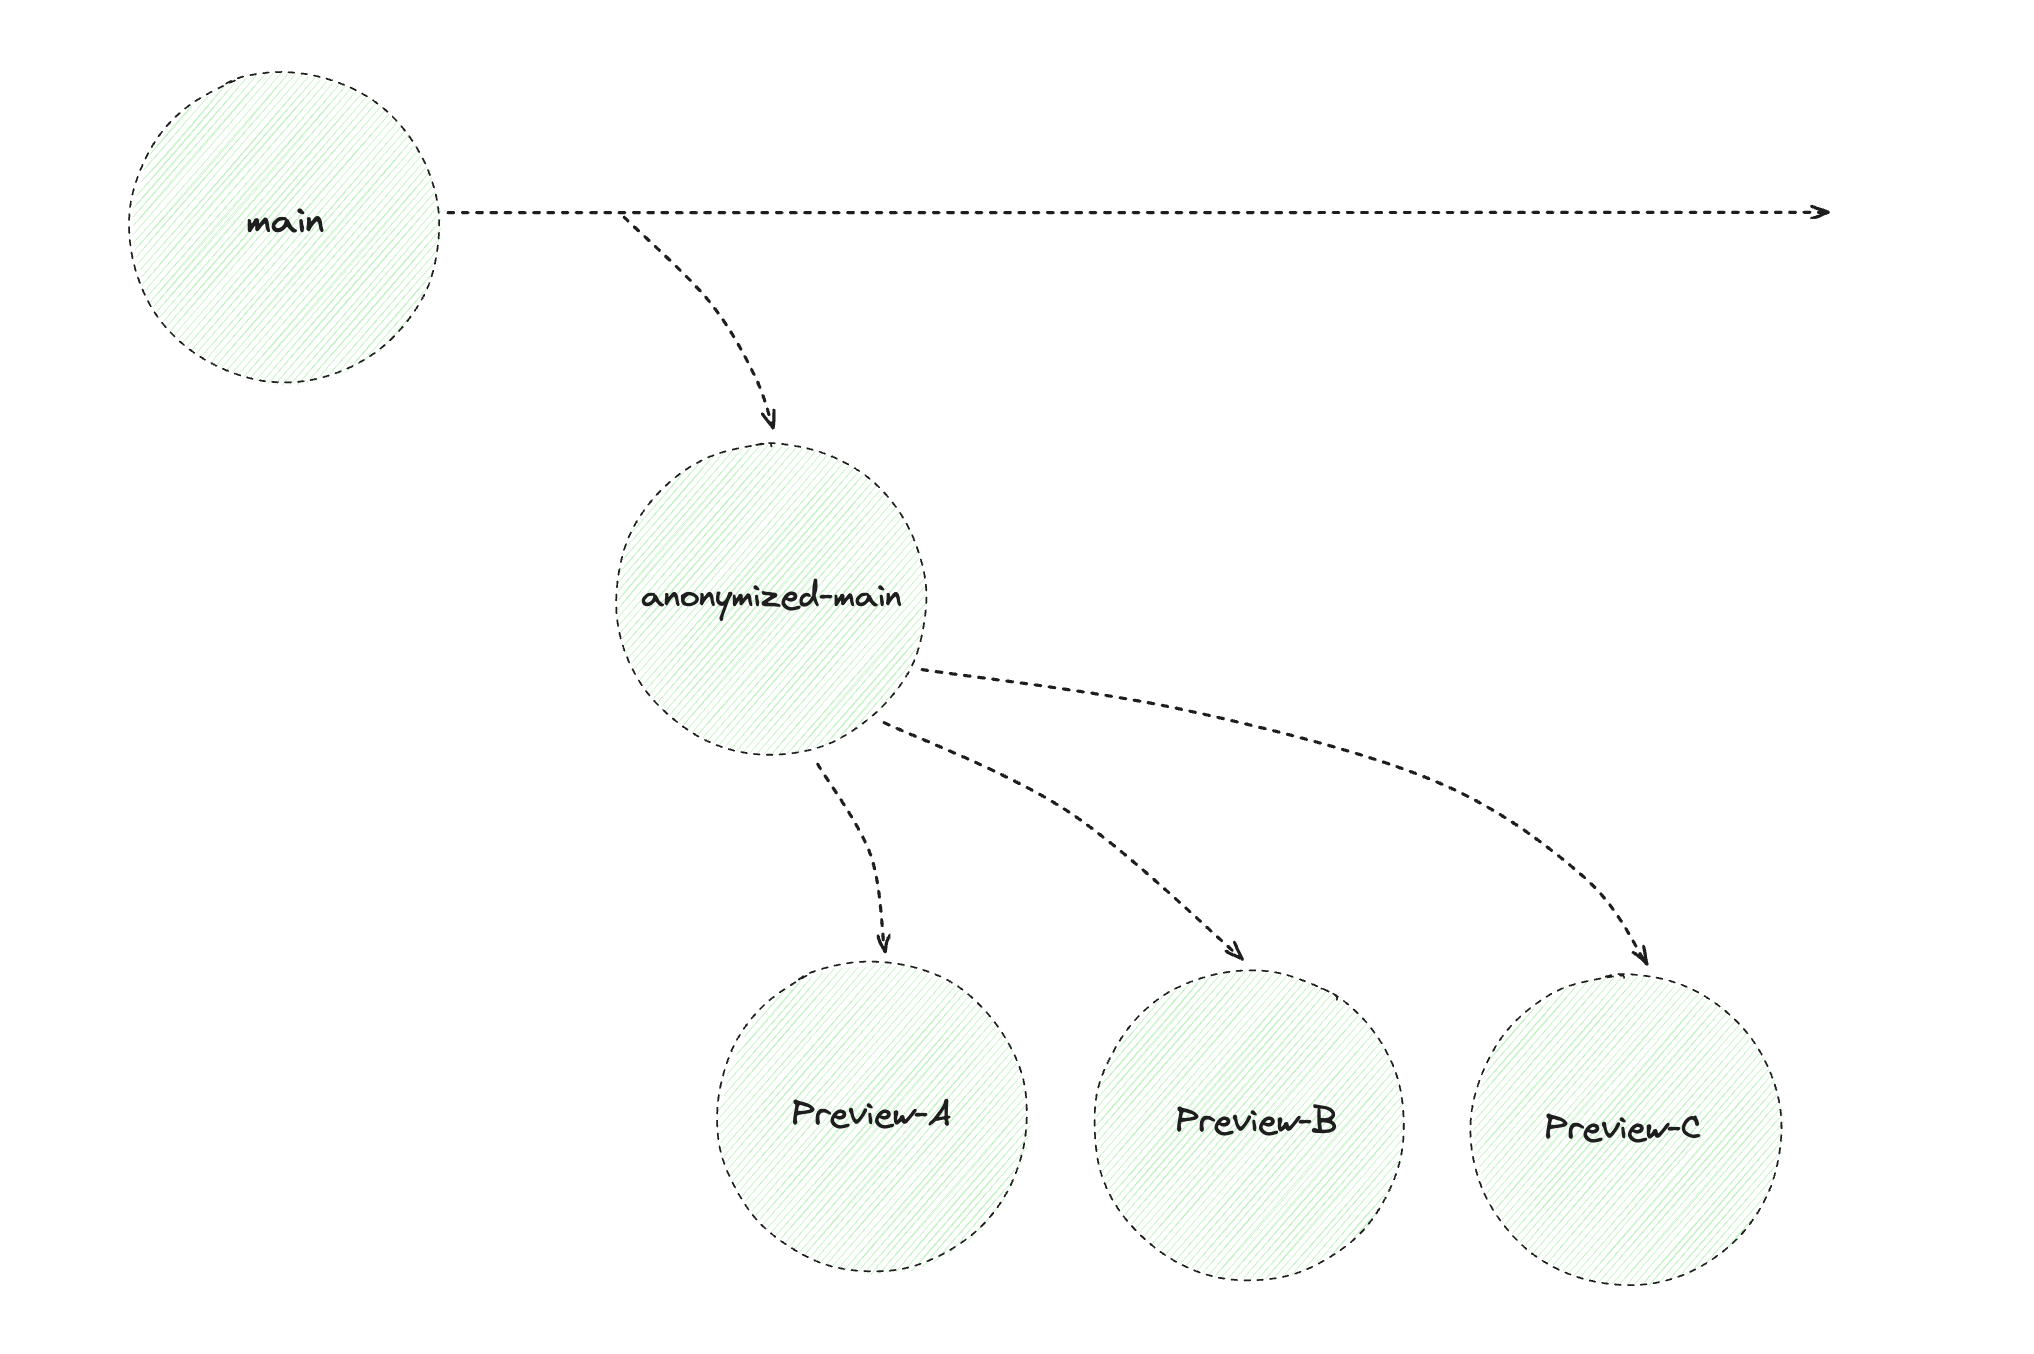
Specifically, you’ll then use the PostgreSQL Anonymizer extension to rewrite a subset of columns in the branch with anonymized values and dynamically mask the others. The result is a database branch, or snapshot, that you can use to instantaneously create more anonymized database branches. A visual illustration of the pattern is provided below.
To get started, create a new database branch:
- Visit the Branches screen for your project on the Neon Console.
- Click New Branch, then enter the following values:
- Name:
anonymized-main - Parent branch:
main - Include data up to:
Current point in time
- Name:
- Click the Create new branch button.
Once your database branch has been created:
- Go to the SQL Editor in your project on the Neon Console.
- Select the
anonymized-mainbranch using the top-right dropdown. - Enable the
anonextension by running the following SQL statement.
CREATE EXTENSION IF NOT EXISTS anon CASCADE;Now that the extension is loaded, you can anonymize columns by applying security labels that define masking policies. The masking policies use functions provided by the PostgreSQL Anonymizer extension.
Apply Static Masking to Specific Columns
Apply the following security labels to define masking policies for the employee and salary data. PostgreSQL Anonymizer will replace the first_name and last_name values with anonymous but plausible values. The hire_date will be shifted plus or minus 28 days, and the salary amount will be shifted plus or minus 20% of the actual value.
-- Replace the first_name with a random first name
SECURITY LABEL FOR anon ON COLUMN employee.first_name
IS 'MASKED WITH FUNCTION anon.fake_first_name()';

-- Replace the last_name with a random last name
SECURITY LABEL FOR anon ON COLUMN employee.last_name
IS 'MASKED WITH FUNCTION anon.fake_last_name()';

-- Shift hire_dates by +/- 28 days
SECURITY LABEL FOR anon ON COLUMN employee.hire_date
IS 'MASKED WITH FUNCTION anon.dnoise(employee.hire_date, ''28 days''::interval)';

-- Shift salaries by +/- 20%
SECURITY LABEL FOR anon ON COLUMN employee_salary.amount
IS 'MASKED WITH FUNCTION anon.noise(employee_salary.amount, 0.2)';
The next step is to anonymize data. You do this using either static or dynamic masking. For this example, you’ll apply static masking to everything except the zip codes. Why might you want static masking on some columns but dynamic masking on others? One use case is to enable certain teams to perform anonymized analytics with original zip codes but prevent other teams from viewing them.
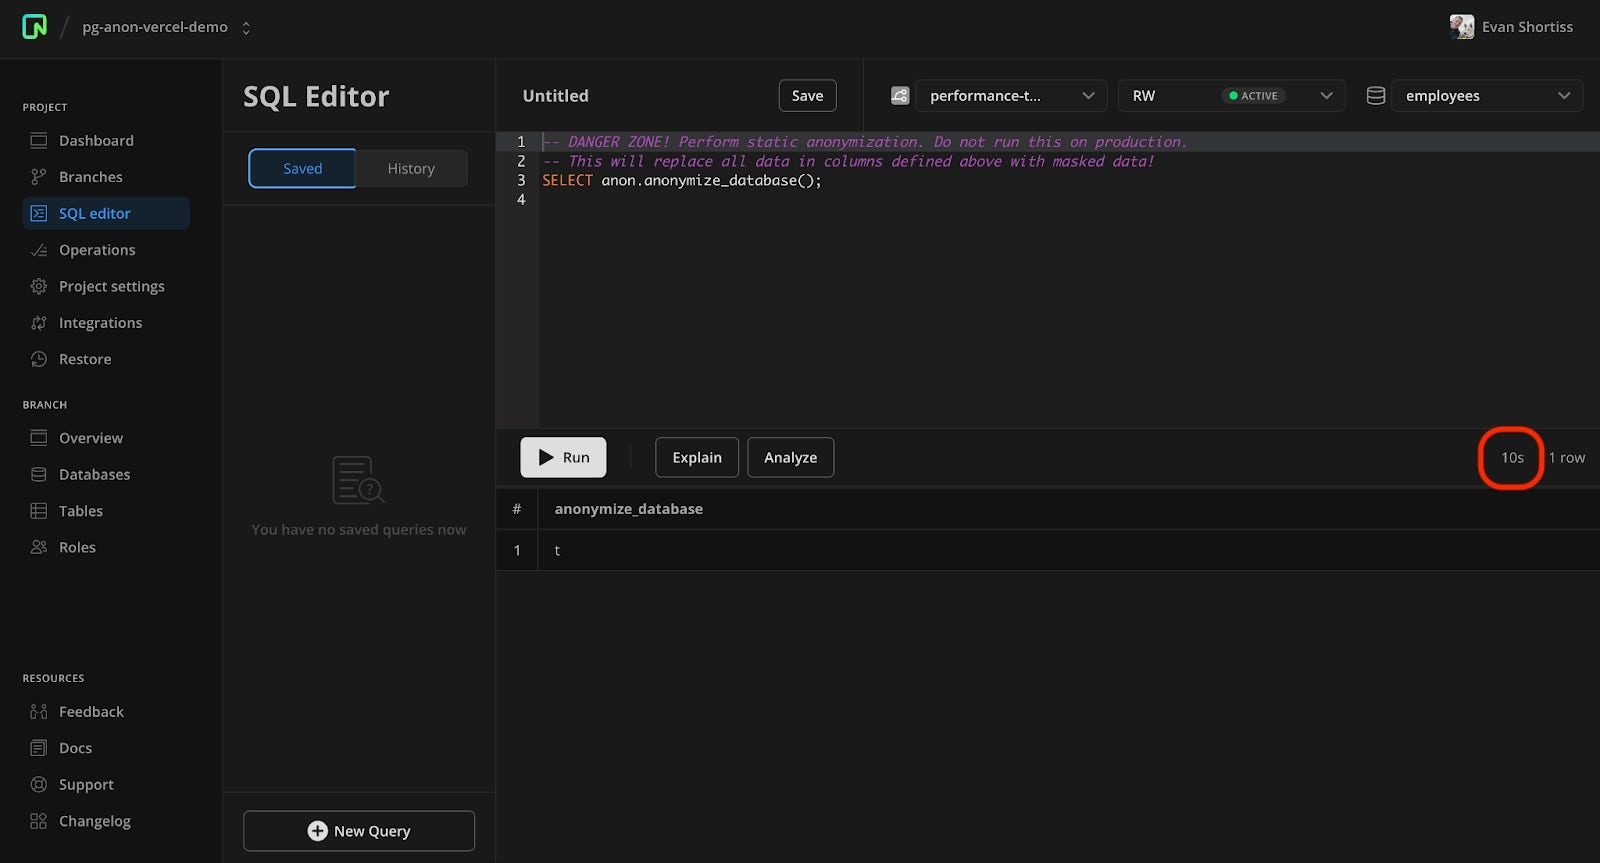
Run the following statement to anonymize the currently labeled columns using static masking.
-- This is a destructive operation. Make sure you've been working
-- with your anonymized-main branch, and not a production branch!
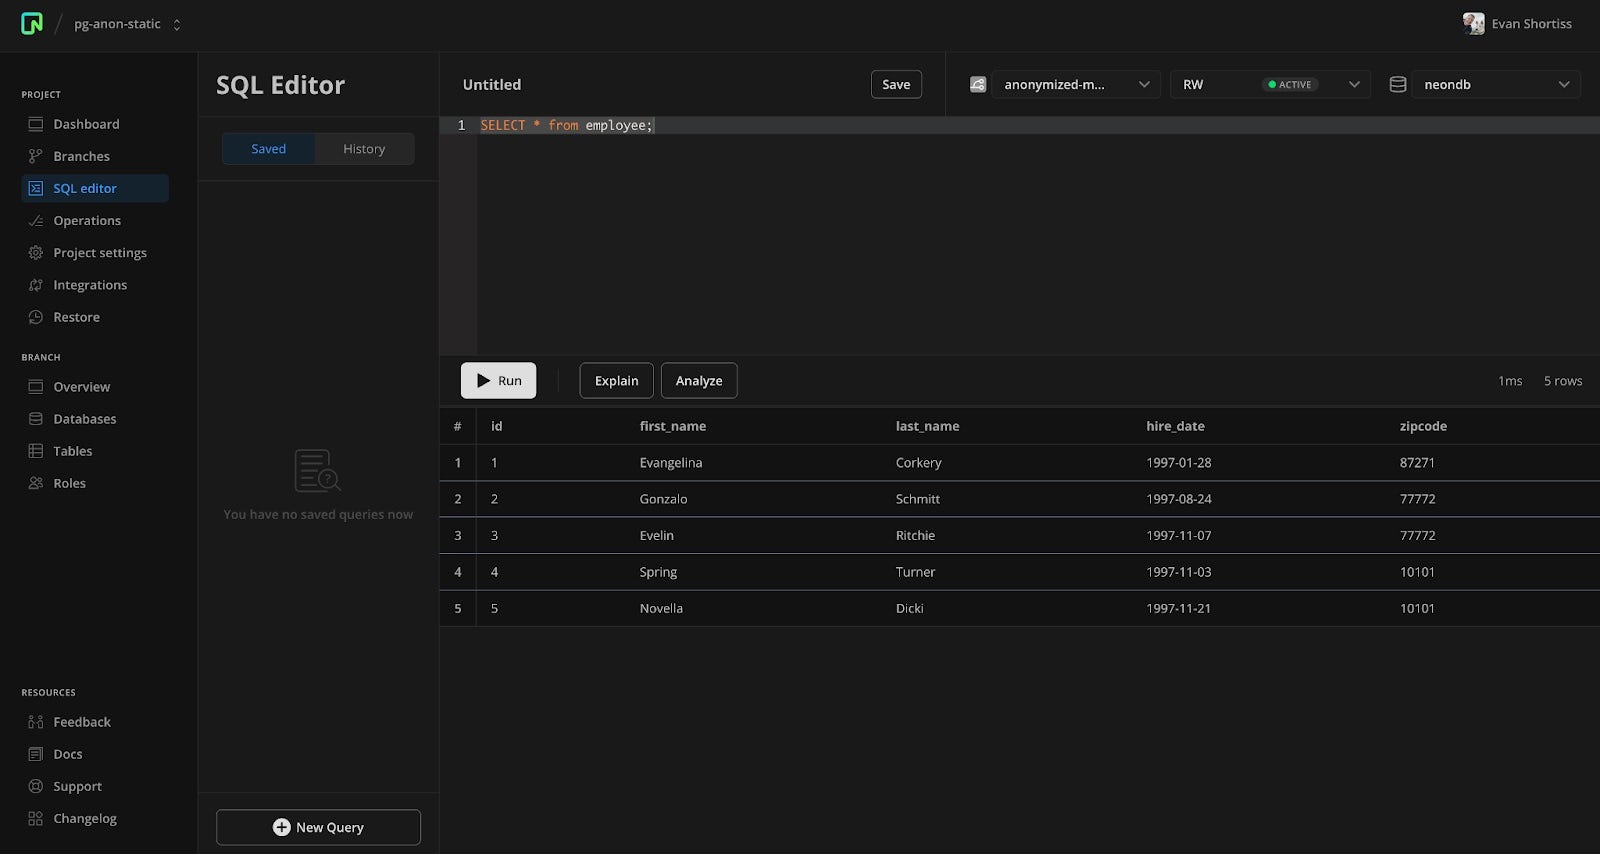
SELECT anon.anonymize_database();Confirm that the static masking worked by issuing a SELECT * from employee. All column values, except the zip code, will be different from the values you initially inserted.
Dynamically Masking Specific Columns
To dynamically mask the employee zip codes, you will:
- Create a new role in the database or declare an existing one masked.
- Remove the security labels you used to perform the static masking because that data has already been masked and doesn’t require dynamic masking.
- Apply security labels to perform dynamic masking of the
zipcodecolumn.
Issue the following SQL statements on your anonymized-main branch to configure dynamic masking.
-- Replace this password with a secure and unique value! This role
-- will be subject to dynamic masking
CREATE ROLE shinra LOGIN PASSWORD 's3cur3_and_dyn4mic!';
SECURITY LABEL FOR anon ON ROLE shinra IS 'MASKED';
-- Remove the labels that were used for static masking
SECURITY LABEL FOR anon ON COLUMN employee.first_name IS NULL;
SECURITY LABEL FOR anon ON COLUMN employee.last_name IS NULL;
SECURITY LABEL FOR anon ON COLUMN employee.hire_date IS NULL;
SECURITY LABEL FOR anon ON COLUMN employee_salary.amount IS NULL;
-- Add labels to define dynamic masking policies
SECURITY LABEL FOR anon ON COLUMN employee.zipcode
IS 'MASKED WITH FUNCTION anon.random_zip()';
-- Start dyanmic masking
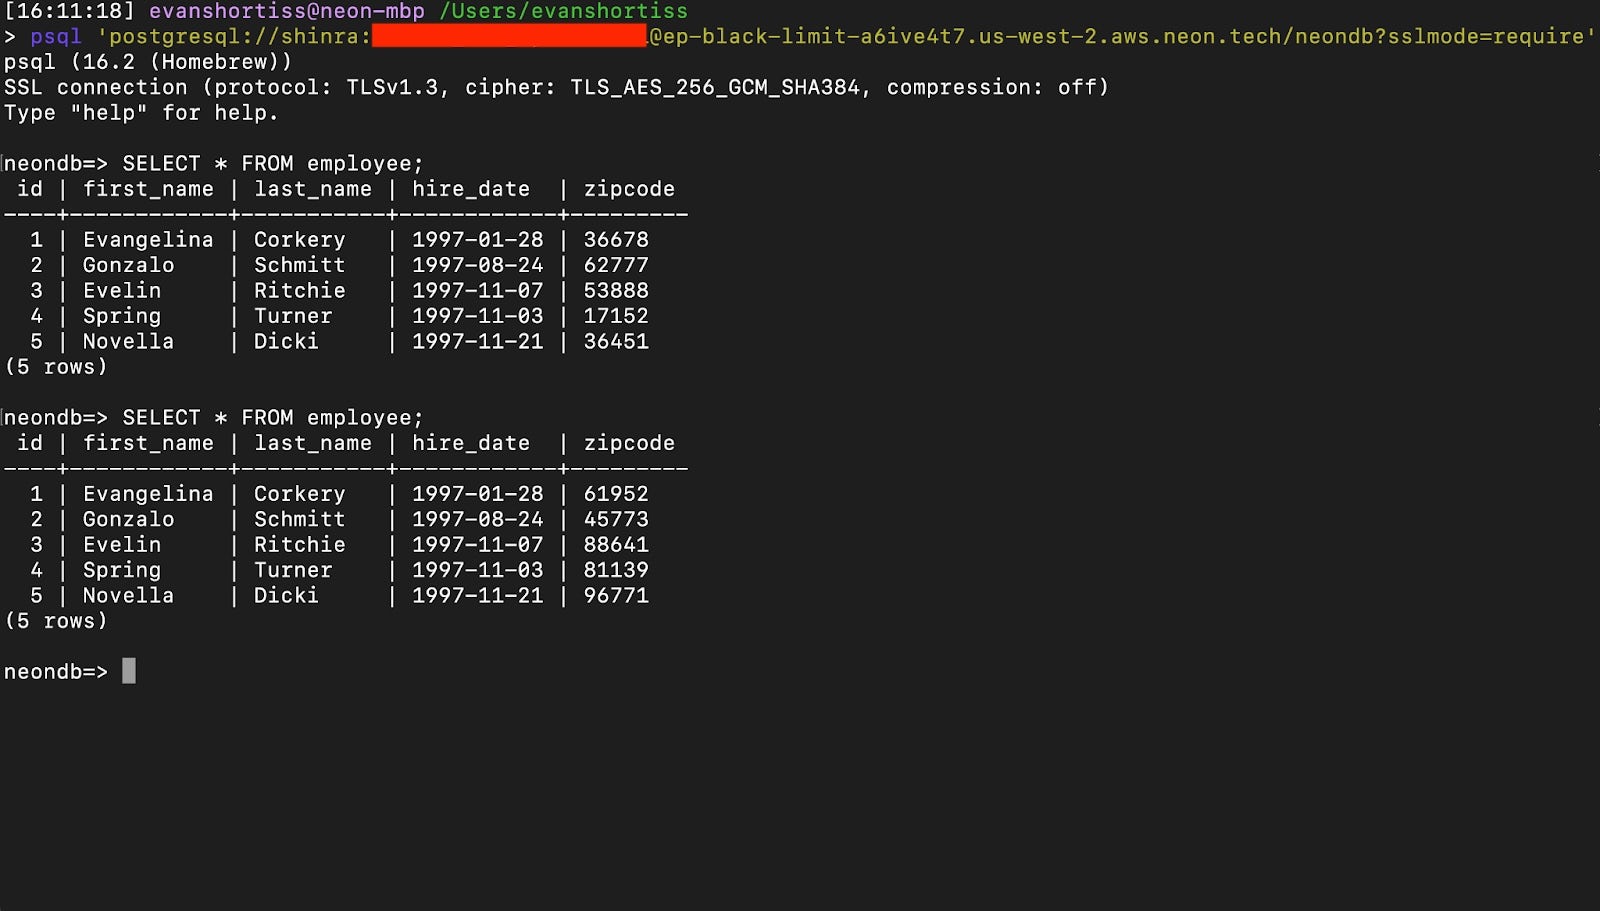
SELECT anon.start_dynamic_masking();Connecting to your database using the new shinra role and issuing a SELECT * from employee query will return rows with the statically anonymized columns and dynamically anonymized zipcode column. Each query that includes the zipcode column will return a dynamically generated value.
That’s it. You’ve successfully applied static and dynamic masking to create an anonymized database branch! Let’s see how you can use Neon’s GitHub Action to create database branches for preview environments.
Create Preview Environments with Anonymized Branches
You can create child database branches from your existing anonymized database branch to act as isolated development and preview database environments. Changes in these environments will not affect the parent anonymized-main branch or other child branches.
An end-to-end example that deploys a preview environment with anonymized data can be seen in the deploy-preview.yaml file in the evanshortiss/neon-pg-anon-example repository on GitHub.
This example uses GitHub Actions for CI/CD and the neondatabase/create-branch-action to create child branches from the anonymized-main database branch. Each child branch is associated with a corresponding preview environment for each open pull request against the repository.
- name: Create Neon Branch
  id: create-neon-branch
  uses: neondatabase/create-branch-action@v4
  with:
    project_id: ${{ env.NEON_PROJECT_ID }}
    api_key: ${{ env.NEON_API_KEY }}
    # Database name to include in the returned connection string
    database: employees
    # Name of the new preview database branch
    branch_name: preview/pr-${{ github.event.number }}
    # Parent database branch on Neon
    parent: anonymized-main
Note: If you’re not using GitHub Actions for CI/CD, you can programmatically manage database branches using the neonctl CLI or the Neon HTTP API. SDKs for the Neon HTTP API are available for Golang, Node.js, and Python.
The create branch action returns a connection string. That connection string is set as an environment variable in the preview environment. The environment variable is then used by the neondatabase/serverless Postgres driver to connect to your newly created anonymized database branch.
Visit the production environment for the example, then visit a preview environment. In addition to the new header styling, you should also notice that the employee data displayed in the preview environment differs from the production environment. This is because the preview environment is linked to a preview database created using an anonymized database branch.
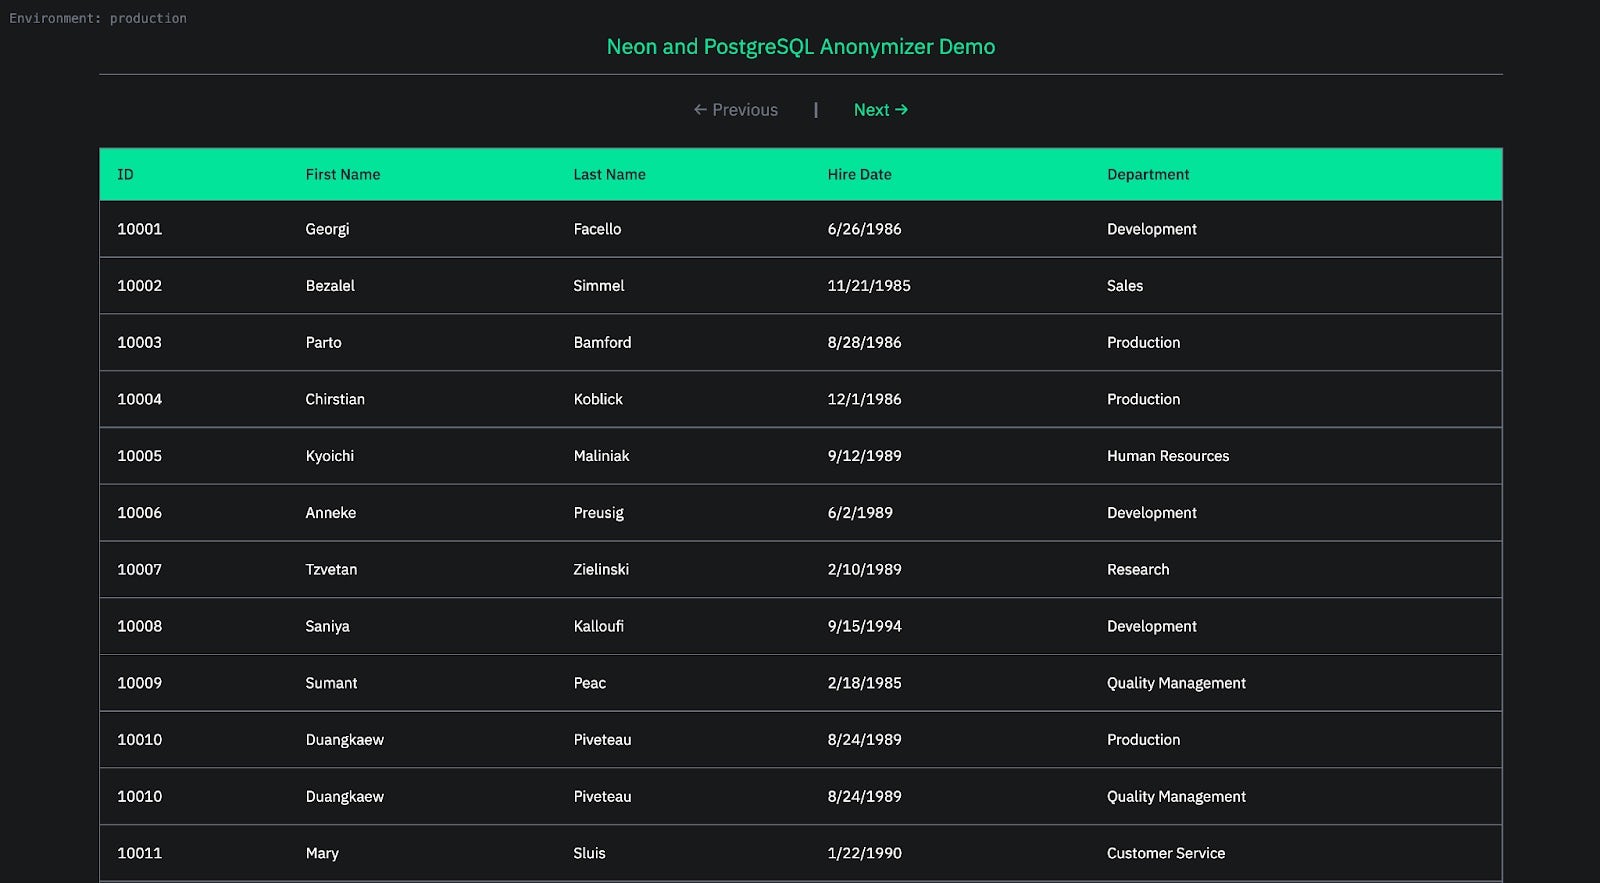
The example is connected to a Neon Postgres database with sample data containing over 300,000 employee records. Our documentation includes the sample employee data and instructions to add it to your database.
Performance Considerations of Anonymization
Choosing between static and dynamic masking will depend on your security requirements, but the size of your database will also influence the decision.
For example, statically masking the 300,000 rows of employee data used in the evanshortiss/neon-pg-anon-example application takes approximately 10 seconds to complete.
On the other hand, statically masking our 7 billion row 1TB database turned out to be impractically slow. In such cases, it might be best to use dynamic masking or to statically mask a subset of the data, as discussed in the PostgreSQL Anonymizer documentation.
Conclusion
Using Neon’s branching capabilities with PostgreSQL Anonymizer allows development teams to instantaneously create anonymized development and preview environments with datasets that match the scale of their production database. Sign up and try it for yourself!
We would love to get your feedback. Follow us on X, join us on Discord, and let us know how we can help you build the next generation of web applications.