Manage projects
Learn how to manage Neon projects from the Neon Console or the Neon API.
With Neon, everything starts with the project. It is the top-level object in the Neon object hierarchy. A project can hold as many databases and branches as your application or workflow needs. However, tier limits define how many projects you can create. The Neon Free Tier limits you to one project per Neon account.
Learn more about projects and how to manage them in these sections:
Default resources
When you add a new project, Neon creates the following resources by default:
- A primary branch called
main. You can create child branches from the primary branch or from any previously created branch. For more information, see Manage branches. - A single read-write compute endpoint. This is the compute instance associated with the branch. For more information, see Manage computes.
- A ready-to-use database, called
neondb, which lives in the project's primary branch. - A default Postgres role that takes its name from your Neon account (the email, Google, GitHub, or partner account that you registered with).
About the Settings page
Once you open a project, you can use the Project settings page to manage that particular project and configure any defaults.
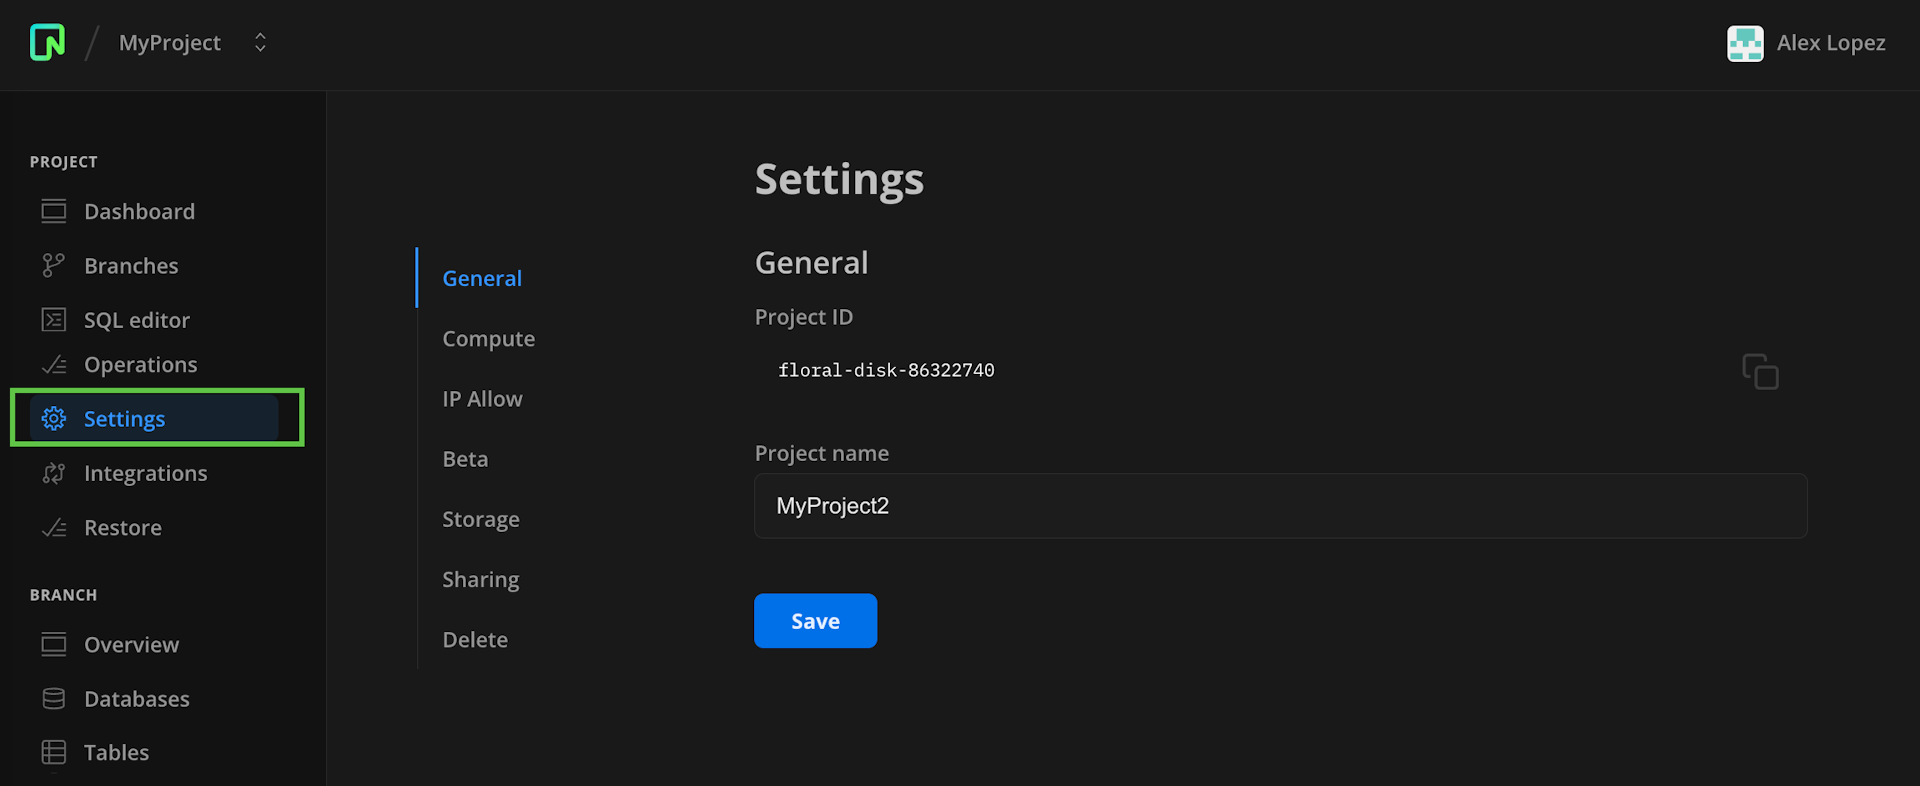
You can tab between these sections:
- General — Change the name of your project or copy the project ID.
- Compute — Set the autosuspend and sizing defaults for any new compute instances you create when branching.
- Storage — Choose how long Neon maintains a history of changes for all branches.
- Sharing — Let other users access your project's databases.
- Delete — Use with care! This action deletes your entire project and all its objects, and is irreversible.
Basic actions
Here are some basic actions you can take to add or manage projects:
Create a project
The following instructions describe how to create additional Neon projects. If you are creating your very first Neon project, refer to the instructions in Sign up. Neon Free Tier users are limited to a single Neon project. Support for multiple projects is only available to users on paid plans.
To create a Neon project:
-
Navigate to the Neon Console.
-
Click New Project.
-
Specify values for Name, Postgres version, and Region. Project names are limited to 64 characters. If you are a paying user, you can specify Compute size settings when creating a project. The settings you specify become the default settings for compute endpoints that you add to your project when creating branches or read replicas.
- Neon supports fixed size computes and autoscaling. For more information, see Compute size and autoscaling configuration.
- The Suspend compute after a period of inactivity setting defines the period of inactivity after which a compute endpoint is automatically suspended. For more information, see Autosuspend configuration.
-
Click Create Project.
After creating a project, you are presented with a dialog that provides your connection details for a ready-to-use neondb database. The connection details include your password.
View projects
To view your projects:
- Navigate to the Neon Console.
- Select Home or the Neon logo at the top left of the Console.
- The Projects page lists your projects, including any projects that have been shared with you.
Change the name or copy the ID of your project
You are permitted to change the name of your project at any point. The project ID is permanent.
To edit a Neon project:
- Navigate to the Neon Console.
- Select the project that you want to edit.
- Select Project settings.
- Select General.
- Make your changes and click Save.
Delete a project
Deleting a project is a permanent action, which also deletes any compute endpoints, branches, databases, and roles that belong to the project.
To delete a project:
- Navigate to the Neon Console.
- Select the project that you want to delete.
- Select Project settings.
- Select Delete.
- Click Delete project.
- On the confirmation dialog, click Delete.
Share a project
Neon's project sharing feature allows you to share your project with other Neon accounts.
To share a project:
- In the Neon Console, select a project.
- Select Project settings.
- Select Sharing.
- Under Grant access to your project, enter the email address of the account you want to share access with.
- Click Grant access.
The email you specify is added to the list of Users with access to the project. The Neon account associated with that email address is granted full access to the project with the exception privileges required to delete the project. This account can also share the project with other Neon users. When that user logs in to Neon, the shared project is listed on their Projects page, under Shared with me.
The costs associated with a shared project are charged to the Neon account that owns the project. For example, if you share your project with another Neon user account, any usage incurred by that user within your project is billed to your Neon account, not theirs.
For additional information, refer to our Project sharing guide.
Advanced settings
From the Project settings page, you can also set defaults or apply bulk changes across your Neon objects:
- Reset default compute size
- Configure history retention range
- Enable logical replication
- Configure IP Allow
Reset the default compute size
Compute size is the number of Compute Units (CUs) assigned to a Neon compute endpoint. The number of CUs determines the processing capacity of the compute endpoint. One CU is equal to 1 vCPU with 4 GB of RAM. Currently, a Neon compute endpoint can have anywhere from .25 CUs to 8 CUs. Larger compute sizes will be supported in a future release.
For Neon Free Tier users, Neon sets your compute size to a static shared .25 vCPU, with 1 GB of RAM for each branch (max 10 branches).
Users on paid plans have the flexibility to choose a compute size for each branch's compute endpoint individually. By default, new branches inherit the compute endpoint size from your first branch (i.e., main). However, there may be times when you want to reset this default. For example, if you want to create a series of read-only replicas, where each replica typically requires less compute per branch.
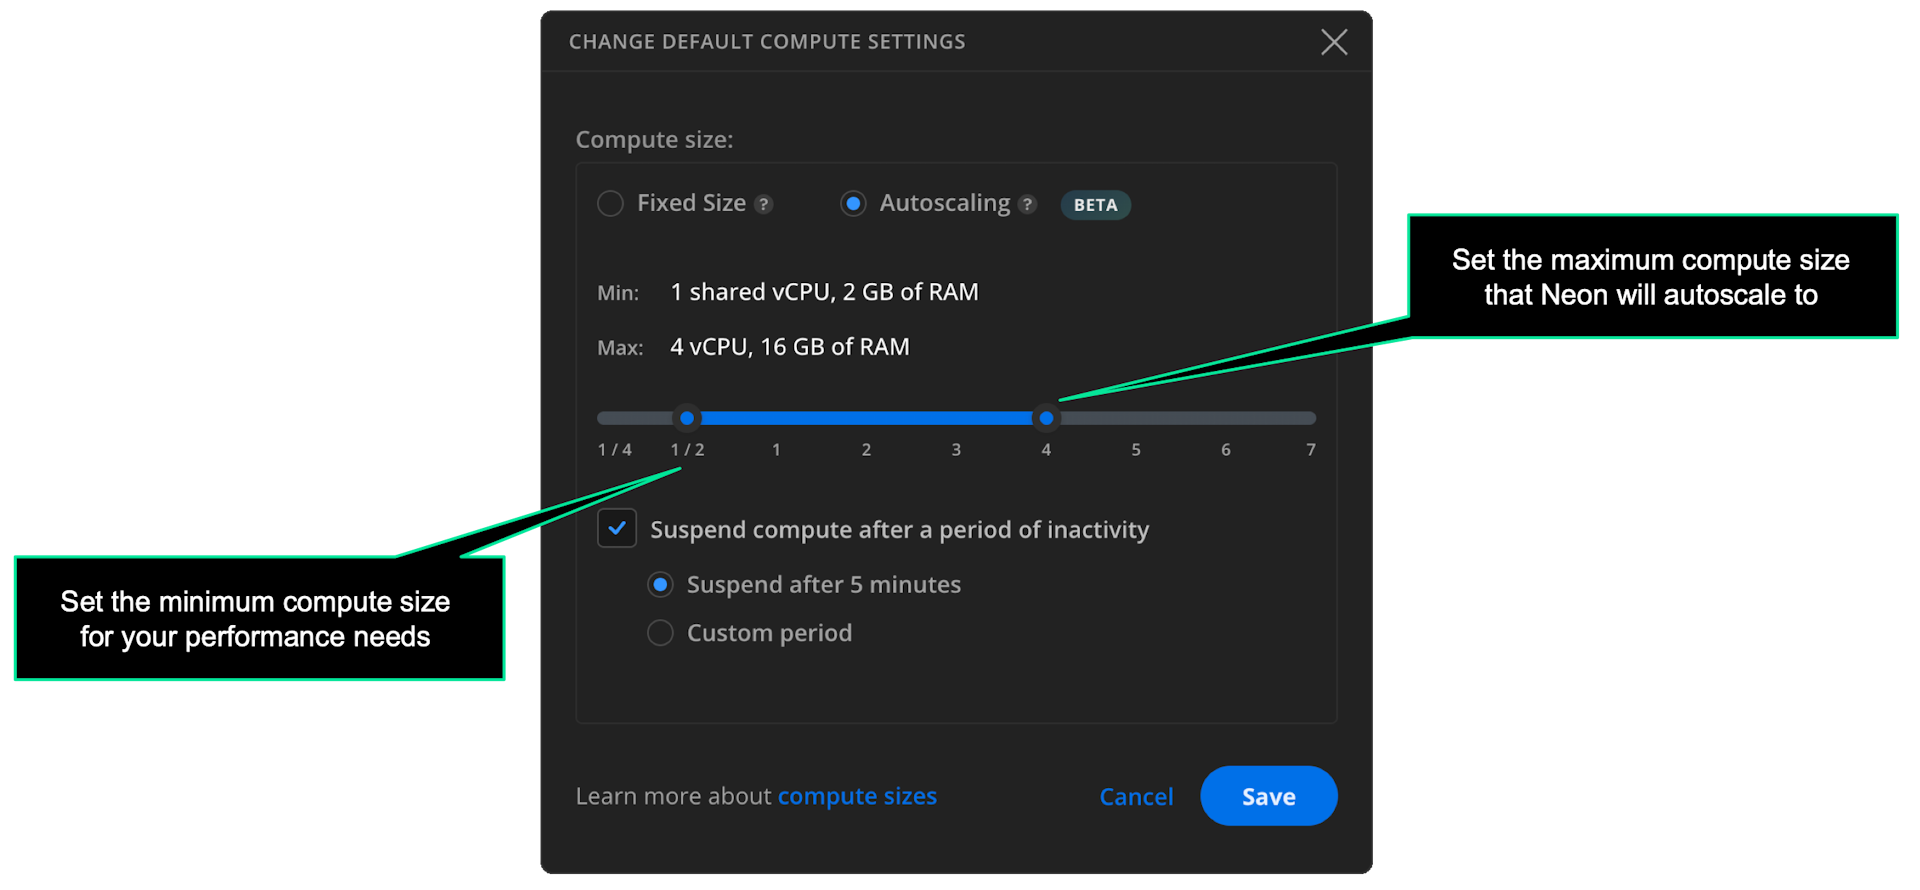
To reset the default compute size, go to Project settings > Compute.
Using the slider, you can configure a fixed-size compute or enable autoscaling.
- Fixed size: Select a fixed compute size ranging from .25 CUs to 8 CUs. A fixed-size compute does not scale to meet workload demand.
- Autoscaling: Specify a minimum and maximum compute size. Neon scales the compute size up and down within the selected compute size boundaries in response to the current load. Currently, the Autoscaling feature supports a range of 1/4 (.25) CU to 8 CUs. The 1/4 CU and 1/2 CU settings are shared compute. For information about how Neon implements the Autoscaling feature, see Autoscaling.
Example: default minimum and maximum autoscale settings
Configure history retention
By default, Neon retains a history of changes for all branches in a Neon project, which allows you to create a branch that restores data to any point within the defined retention period. The supported limits are 24 hours for Neon Free Tier users, 7 days for Launch plan users, and 30 days for Scale plan users. Please be aware that increasing the history retention period affects all branches in your project and increases project storage.
To configure the history retention period for a project:
- Select a project in the Neon Console.
- On the Neon Dashboard, select Project settings.
- Select Storage.
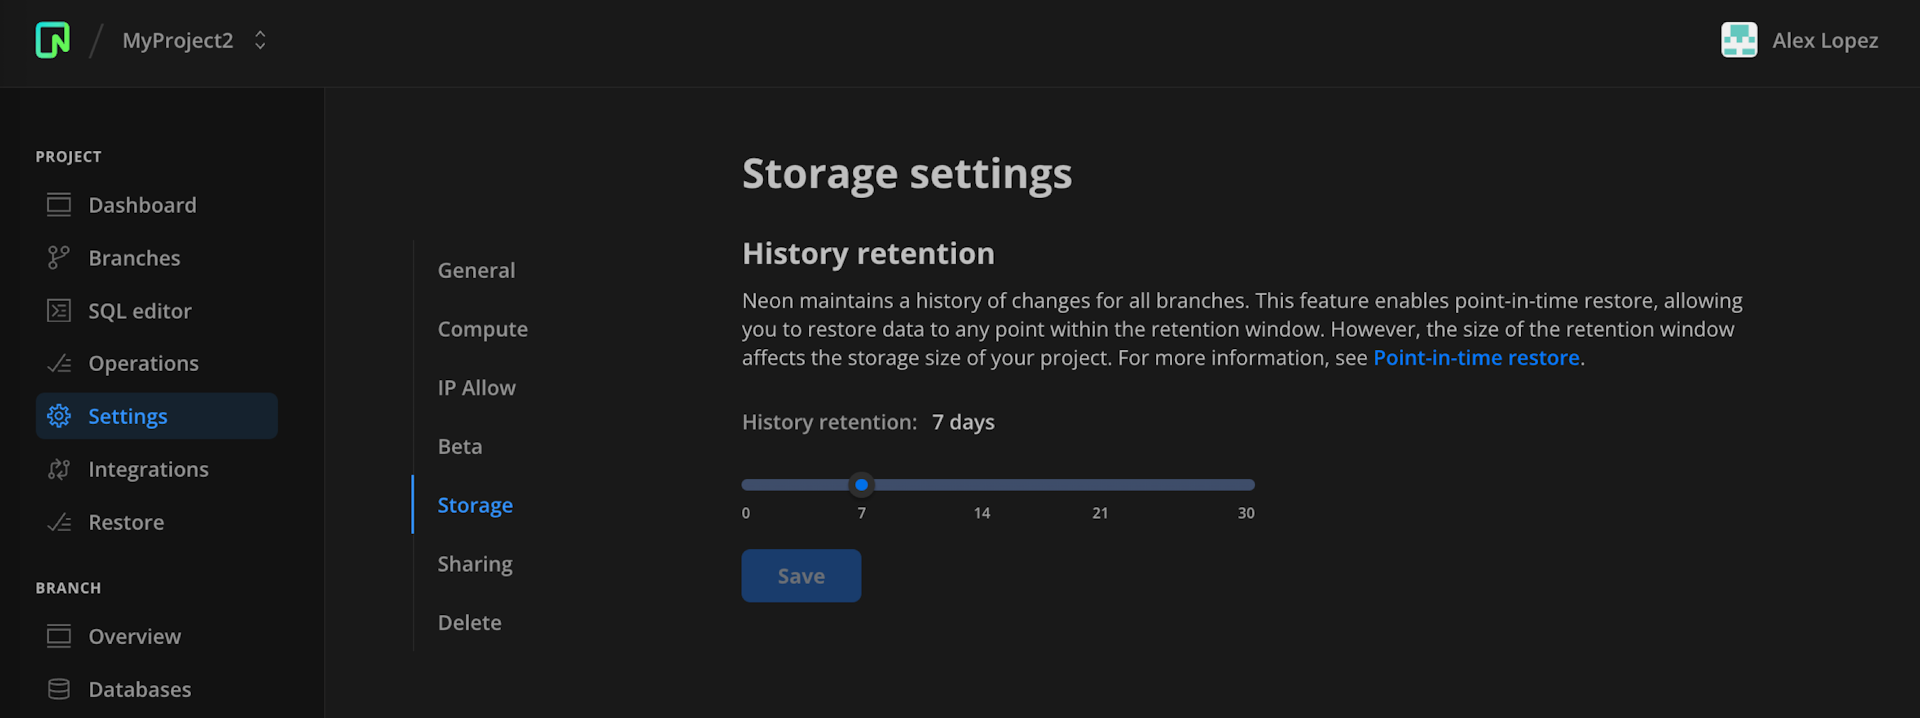
- Use the slider to select the history retention period.
- Click Save.
Enable logical replication
Logical replication enables replicating data from your Neon databases to a variety of external destinations, including data warehouses, analytical database services, messaging platforms, event-streaming platforms, and external Postgres databases.
important
Enabling logical replication modifies the PostgreSQL wal_level configuration parameter, changing it from replica to logical for all databases in your Neon project. Once the wal_level setting is changed to logical, it cannot be reverted. Enabling logical replication also restarts all computes in your Neon project, meaning that active connections will be dropped and have to reconnect.
To enable logical replication for your project:
- Select your project in the Neon Console.
- On the Neon Dashboard, select Project settings.
- Select Beta.
- Click Enable.
You can verify that logical replication is enabled by running the following query:
SHOW wal_level;
wal_level
-----------
logical
After enabling logical replication, the next steps involve creating publications on your replication source database in Neon and configuring subscriptions on the destination system or service. To get started, refer to our logical replication guides.
Configure IP Allow
Available to Scale plan users, the IP Allow feature provides an added layer of security for your data, restricting access to the branch where your database resides to only those IP addresses that you specify. In Neon, the IP allowlist is applied to all branches by default.
Optionally, you can allow unrestricted access to your project's non-primary branches. For instance, you might want to restrict access to the primary branch to a handful of trusted IPs while allowing unrestricted access to your development branches.
By default, Neon allows IP addresses from 0.0.0.0, which means that Neon accepts connections from any IP address. Once you configure IP Allow by adding IP addresses or ranges, only those IP addresses will be allowed to access Neon.
To configure an allowlist:
- Select a project in the Neon Console.
- On the Neon Dashboard, select Project settings.
- Select IP Allow.
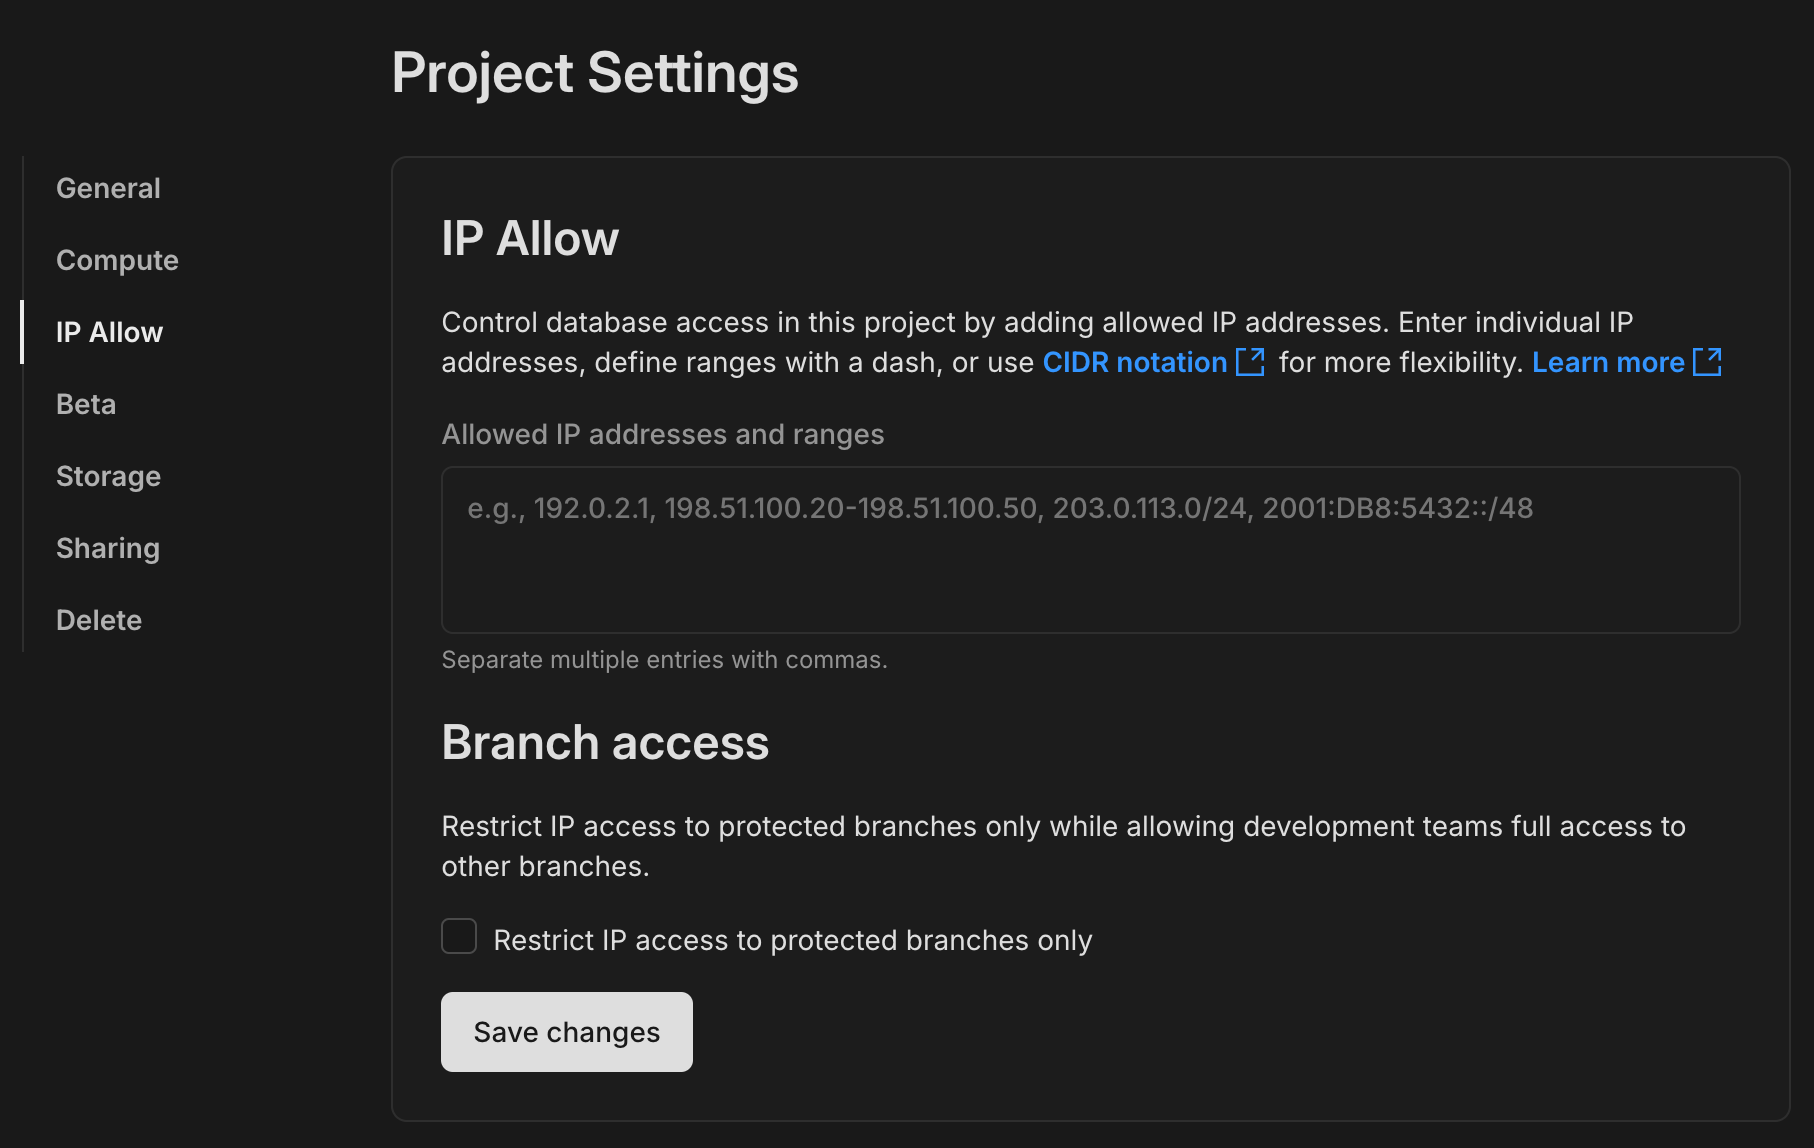
- Specify the IP addresses you want to permit. Separate multiple entries with commas.
- Optionally, select Allow unrestricted access to non-primary branches to allow full access to your no primary branches.
- Click Save changes.
How to specify IP addresses
You can define an allowlist with individual IP addresses, IP ranges, or CIDR notation. A combination of these options is also permitted. Multiple entries, whether they are the same or of different types, must be separated by a comma. Whitespace is ignored.
-
Add individual IP addresses: You can add individual IP addresses that you want to allow. This is useful for granting access to specific users or devices. This example represents a single IP address:
192.0.2.1 -
Define IP ranges: For broader access control, you can define IP ranges. This is useful for allowing access from a company network or a range of known IPs. This example range includes all IP addresses from
198.51.100.20to198.51.100.50:198.51.100.20-198.51.100.50 -
Use CIDR notation: For more advanced control, you can use CIDR (Classless Inter-Domain Routing) notation. This is a compact way of defining a range of IPs and is useful for larger networks or subnets. Using CIDR notation can be advantageous when managing access to branches with numerous potential users, such as in a large development team or a company-wide network.
This CIDR notation example represents all 256 IP addresses from
203.0.113.0to203.0.113.255.203.0.113.0/24 -
Use IPv6 addresses: Neon also supports specifying IPv6 addresses. For example:
2001:DB8:5432::/48
A combined example using all three options above, specified as a comma-separated list, would appear similar to the following:
192.0.2.1, 198.51.100.20-198.51.100.50, 203.0.113.0/24, 2001:DB8:5432::/48This list combines individual IP addresses, a range of IP addresses, a CIDR block, and an IPv6 address. It illustrates how different types of IP specifications can be used together in a single allowlist configuration, offering a flexible approach to access control.
Update an IP Allow configuration
You can update your IP Allow configuration via the Neon Console or API as described in Configure IP Allow. Replace the current configuration with the new configuration. For example, if your IP Allow configuration currently allows access from IP address 192.0.2.1, and you want to extend access to IP address 192.0.2.2, specify both addresses in your new configuration: 192.0.2.1, 192.0.2.2. You cannot append values to an existing configuration. You can only replace an existing configuration with a new one.
The Neon CLI provides an ip-allow command with add, reset, and remove options that you can use to update your IP Allow configuration. For instructions, refer to Neon CLI commands — ip-allow.
Remove an IP Allow configuration
To remove an IP configuration entirely to go back to the default "no IP restrictions" (0.0.0.0) configuration:
- Select a project in the Neon Console.
- On the Neon Dashboard, select Project settings.
- Select IP Allow.
- Clear the Allowed IP addresses and ranges field.
- If applicable, clear the Apply to primary branch only checkbox.
- Click Apply changes.
Manage projects with the Neon API
Project actions performed in the Neon Console can also be performed using the Neon API. The following examples demonstrate how to create, view, and delete projects using the Neon API. For other project-related API methods, refer to the Neon API reference.
note
The API examples that follow may not show all of the user-configurable request body attributes that are available to you. To view all attributes for a particular method, refer to method's request body schema in the Neon API reference.
The jq option specified in each example is an optional third-party tool that formats the JSON response, making it easier to read. For information about this utility, see jq.
Prerequisites
A Neon API request requires an API key. For information about obtaining an API key, see Create an API key. In the cURL examples shown below, $NEON_API_KEY is specified in place of an actual API key, which you must provide when making a Neon API request.
Create a project with the API
The following Neon API method creates a project. The Neon Free Tier permits one project per account. To view the API documentation for this method, refer to the Neon API reference.
POST /projectsThe API method appears as follows when specified in a cURL command. The myproject name value is a user-specified name for the project.
curl 'https://console.neon.tech/api/v2/projects' \
  -H 'Accept: application/json' \
  -H "Authorization: Bearer $NEON_API_KEY" \
  -H 'Content-Type: application/json' \
  -d '{
  "project": {
    "name": "myproject"
  }
}' | jq
The response includes information about the roles, the ready-to-use database (neondb), the primary branch (main), and the read-write compute endpoint that is created with the project.
Response body
{
  "project": {
    "cpu_used_sec": 0,
    "id": "ep-cool-darkness-123456",
    "platform_id": "aws",
    "region_id": "aws-us-east-2",
    "name": "myproject",
    "provisioner": "k8s-pod",
    "pg_version": 15,
    "locked": false,
    "created_at": "2023-01-04T17:33:11Z",
    "updated_at": "2023-01-04T17:33:11Z",
    "proxy_host": "us-east-2.aws.neon.tech",
    "branch_logical_size_limit": 3072
  },
  "connection_uris": [
    {
      "connection_uri": "postgres://alex:AbC123dEf@ep-cool-darkness-123456.us-east-2.aws.neon.tech/dbname"
    }
  ],
  "roles": [
    {
      "branch_id": "br-falling-frost-286006",
      "name": "alex",
      "password": "AbC123dEf",
      "protected": false,
      "created_at": "2023-01-04T17:33:11Z",
      "updated_at": "2023-01-04T17:33:11Z"
    },
    {
      "branch_id": "br-falling-frost-286006",
      "name": "web_access",
      "protected": true,
      "created_at": "2023-01-04T17:33:11Z",
      "updated_at": "2023-01-04T17:33:11Z"
    }
  ],
  "databases": [
    {
      "id": 1138408,
      "branch_id": "br-falling-frost-286006",
      "name": "dbname",
      "owner_name": "alex",
      "created_at": "2023-01-04T17:33:11Z",
      "updated_at": "2023-01-04T17:33:11Z"
    }
  ],
  "operations": [
    {
      "id": "b7c32d83-6402-49c8-b40b-0388309549da",
      "project_id": "ep-cool-darkness-123456",
      "branch_id": "br-falling-frost-286006",
      "action": "create_timeline",
      "status": "running",
      "failures_count": 0,
      "created_at": "2023-01-04T17:33:11Z",
      "updated_at": "2023-01-04T17:33:11Z"
    },
    {
      "id": "756f2b87-f45c-4a61-9b21-6cd3f3c48c68",
      "project_id": "ep-cool-darkness-123456",
      "branch_id": "br-falling-frost-286006",
      "endpoint_id": "ep-jolly-moon-631024",
      "action": "start_compute",
      "status": "scheduling",
      "failures_count": 0,
      "created_at": "2023-01-04T17:33:11Z",
      "updated_at": "2023-01-04T17:33:11Z"
    }
  ],
  "branch": {
    "id": "br-falling-frost-286006",
    "project_id": "ep-cool-darkness-123456",
    "name": "main",
    "current_state": "init",
    "pending_state": "ready",
    "created_at": "2023-01-04T17:33:11Z",
    "updated_at": "2023-01-04T17:33:11Z"
  },
  "endpoints": [
    {
      "host": "ep-jolly-moon-631024.us-east-2.aws.neon.tech",
      "id": "ep-jolly-moon-631024",
      "project_id": "ep-cool-darkness-123456",
      "branch_id": "br-falling-frost-286006",
      "autoscaling_limit_min_cu": 1,
      "autoscaling_limit_max_cu": 1,
      "region_id": "aws-us-east-2",
      "type": "read_write",
      "current_state": "init",
      "pending_state": "active",
      "settings": {
        "pg_settings": {}
      },
      "pooler_enabled": false,
      "pooler_mode": "transaction",
      "disabled": false,
      "passwordless_access": true,
      "created_at": "2023-01-04T17:33:11Z",
      "updated_at": "2023-01-04T17:33:11Z",
      "proxy_host": "us-east-2.aws.neon.tech"
    }
  ]
}
List projects with the API
The following Neon API method lists projects for your Neon account. To view the API documentation for this method, refer to the Neon API reference.
GET /projectsThe API method appears as follows when specified in a cURL command:
curl 'https://console.neon.tech/api/v2/projects' \
 -H 'Accept: application/json' \
 -H "Authorization: Bearer $NEON_API_KEY" | jq
Response body
{
  "projects": [
    {
      "cpu_used_sec": 0,
      "id": "purple-shape-491160",
      "platform_id": "aws",
      "region_id": "aws-us-east-2",
      "name": "purple-shape-491160",
      "provisioner": "k8s-pod",
      "pg_version": 15,
      "locked": false,
      "created_at": "2023-01-03T18:22:56Z",
      "updated_at": "2023-01-03T18:22:56Z",
      "proxy_host": "us-east-2.aws.neon.tech",
      "branch_logical_size_limit": 3072
    }
  ]
}
Update a project with the API
The following Neon API method updates the specified project. To view the API documentation for this method, refer to the Neon API reference.
PATCH /projects/{project_id}The API method appears as follows when specified in a cURL command. The project_id is a required parameter. The example changes the project name to project1.
curl 'https://console.neon.tech/api/v2/projects/ep-cool-darkness-123456' \
  -H 'accept: application/json' \
  -H "Authorization: Bearer $NEON_API_KEY" \
  -H 'Content-Type: application/json' \
  -d '{
  "project": {
    "name": "project1"
  }
}'
Response body
{
  "project": {
    "cpu_used_sec": 0,
    "id": "ep-cool-darkness-123456",
    "platform_id": "aws",
    "region_id": "aws-us-east-2",
    "name": "project1",
    "provisioner": "k8s-pod",
    "pg_version": 15,
    "locked": false,
    "created_at": "2023-01-04T17:33:11Z",
    "updated_at": "2023-01-04T17:36:17Z",
    "proxy_host": "us-east-2.aws.neon.tech",
    "branch_logical_size_limit": 3072
  },
  "operations": []
}
Delete a project with the API
The following Neon API method deletes the specified project. To view the API documentation for this method, refer to the Neon API reference.
DELETE /projects/{project_id}The API method appears as follows when specified in a cURL command. The project_id is a required parameter.
curl -X 'DELETE' \
  'https://console.neon.tech/api/v2/projects/ep-cool-darkness-123456' \
  -H 'accept: application/json' \
  -H "Authorization: Bearer $NEON_API_KEY"
Response body
{
  "project": {
    "cpu_used_sec": 0,
    "id": "ep-cool-darkness-123456",
    "platform_id": "aws",
    "region_id": "aws-us-east-2",
    "name": "project1",
    "provisioner": "k8s-pod",
    "pg_version": 15,
    "locked": false,
    "created_at": "2023-01-04T17:33:11Z",
    "updated_at": "2023-01-04T17:36:17Z",
    "proxy_host": "us-east-2.aws.neon.tech",
    "branch_logical_size_limit": 3072
  }
}
Need help?
Join our Discord Server to ask questions or see what others are doing with Neon. Users on paid plans can open a support ticket from the console. For more detail, see Getting Support.
Last updated on